
FLEET DEFENDER: F-14 TOMCAT by Microprose is one of the most complicated
and realistic PC air combat simulators ever created. Unfortunately, the
two manuals included with the game are just not up to the task of training
the player on how to use the simulation's many features. The purpose of
this article is therefore to supplement the error-ridden and incomplete
documentation included with the game. Corrections will be given as appropriate
and areas just glossed over or ignored entirely in the manuals will be
expanded upon. I will also describe workarounds for some of FLEET DEFENDER's
more bothersome bugs, and will conclude with some hints and tactics which
the reader may find useful.
Unless otherwise noted, it is assumed throughout that all difficulty
levels are set to "authentic."
No matter what the visibility conditions, it is never necessary to fly
the standard upwind/crosswind/downwind/base/final approach--you can always
just fly straight in if you desire. In fact, if you choose to do it "the
right way," you must make sure you fly your upwind leg offset to the right
of the carrier. If you are in line with the carrier during your upwind
leg, the Landing Signals Officer (LSO) will think you're on final already
and start giving you confusing landing instructions instead of ignoring
you as you would expect him to at this point.
Once you turn onto final or if you're making a straight in approach,
you should devote much of your attention to the instrument landing system
(ILS). Contrary to what the manual says, FLEET DEFENDER does include a
full ILS system, including a course deviation indicator (vertical needle)
and glide slope deviation indicator (horizontal needle) overlaid on the
vertical display indicator (VDI). It is beyond the scope of this article
to fully describe the procedure for making an ILS approach. Basically,
the goal is to keep the needles centered until just before touching down.
The ILS needles appear on the VDI only when you are fairly close to and
almost directly astern of the carrier and not too far off the proper glide
slope, i.e., when you're on your final approach.
Real pilots perform a cyclical visual scan as they come in for a landing,
glancing through a sequence of instruments and out the canopy over and
over again to make sure everything's in the groove. This technique works
well in FLEET DEFENDER and many other flight simulators. When I'm too far
away to see the carrier (this can be less than two miles out when landing
at night in bad weather), I cycle between the ILS needles, airspeed, and
heading. Once I'm close enough to "call the ball," I add the velocity vector
indicator (VVI, incorrectly described as a "vertical velocity indicator"
in the manual) to my scan, making sure it's placed just past the wires
on the angled deck.
The astute reader may notice that I did not include the meatball and
the AOA indexer in my visual scan. This was intentional. The meatball actually
guides you in on a steeper approach angle than the LSO wants you to use.
You can still land safely if you follow the ball, but the LSO will complain
that you're too high all the way in. Note that your ILS agrees with the
LSO, not the meatball. The meatball's only real use if you follow the LSO's
instructions is for signaling when you've been waved off by flashing four
red lights in a box pattern, providing visual backup for the LSO's "wave
off!" command. The AOA indexer does not function as it should, but instead
seems to echo the meatball information (glide slope deviation as opposed
to angle of attack). Because the AOA indexer doesn't work, I use airspeed
as a substitute in my visual scan and try to keep it between 130 and 140
knots.
The LSO gives some misleading instructions as you make your approach.
"Come left" and "come right" are obvious, but when he says "reduce power"
he does not want you to reduce power. Instead, he means that you are above
the proper glide slope as defined by the ILS and he wants you to increase
your descent rate. Conversely, "add power" means that you are below the
glide slope. If the low speed flight model in FLEET DEFENDER were more
realistic, you would indeed add or reduce power to control your descent
rate and get back on the glide slope. In the game, however, it is most
effective to pitch your nose up and down to control your descent rate and
use your throttle to control your speed. The LSO will never tell you when
you're going too slowly, but your wings will start to rock from side to
side below 130 knots, which should give you a clue that you'd better throttle
up before you stall out. He will inform you if you're coming in too fast,
however ("you're fast").
In order to get better throttle response on the approach and especially
in case of a bolter, I have heard that real navy pilots will make their
final approaches with their speed brakes out and use a higher throttle
setting. This technique translates well to the simulation, and I recommend
using it.
Because the carrier is moving forward and the deck is angled to the
left, you cannot line up your nose with the centerline and expect to maintain
that lineup as you come in. The carrier will appear to drift to the right
as it continues to move. Be prepared to compensate for this by aiming the
VVI to the right of the centerline. With a bit of practice, you will get
a feel for how much heading bias to the right at different stages in your
final approach is necessary to touch down on the centerline.
Now all that's left is to hop into the game and practice some landings.
But where are the "Fleet Readiness Training" missions talked about in the
manual? They are there in the Oceana theatre as you would expect, but they
do not have their own campaign heading. Instead, they are lumped in as
the last few missions in the "Miscellaneous DACT" category. These will
allow you to practice day or night launches and landings in a variety of
weather conditions.
If all this is just too much for you to deal with, take heart. Microprose
decided at the last minute to allow use of the landing cheat key even at
the hardest difficulty level with training mode turned off. Hitting this
key repeatedly will eventually take you to a point just before touch down.
As long as you don't mess with the controls too much, this will quickly
zip you through the landing process and put you safely on the carrier deck.
You will probably spend much of your time in the two track while scan
(TWS) radar modes executing AIM-54 attacks, the F-14's bread and butter,
so they will be discussed first. These radar modes are the most complex,
but mastering them will give you a much better chance of succeeding in
your missions.
Radar blips in the tactical information display (TID) have "aspect markers"
attached to them only when in TWS-A, TWS-M, and PDSTT modes. These little
line segments stick out from blips to show the direction that the targets
are heading, with the angle at which the line segment leaves the blip being
equal to the target's aspect angle as defined in the manual. When any target
comes within AIM-54 range while in TWS-A mode, the aspect marker will begin
to flash, not the entire blip as the manual seems to state. This is true
regardless of which weapon type you currently have selected. In TWS-M mode,
only targets you have manually designated will have their aspect markers
flash when in Phoenix range.
It is often impossible to select between closely-spaced targets on the
TID when trying to highlight each of them. You will be able to highlight
only one of the group, and there is no way around it. This usually does
not present a problem, however, since if multiple planes are flying that
close together, it's a good bet that they are in tight formation at about
the same altitude, flying for the same country. Getting information for
one is about as good as getting it for all. Thankfully, while you cannot
highlight them separately, it is still possible to designate each target
in a group when in TWS-M mode simply by clicking repeatedly on the cluster.
In order to IFF multiple targets quickly, I have discovered an undocumented
trick of holding down the left mouse button and then sweeping the pointer
around to the various targets in turn while in TWS mode. Hold the mouse
button down until you're done and hit the IFF key as each target is highlighted
in turn. This trick is also useful for checking range and altitude for
a number of separate targets.
The manual states that the TWS radar modes at "authentic" level can
only be used with the 40 degree/2 bar and 20 degree/4 bar scan volume settings.
While my sources tell me that this would be a realistic restriction, it
is not actually enforced by the program. You can use TWS with a 65 degree/8
bar radar cone if you like with no problem, or you can artificially restrict
yourself for greater realism.
In TWS-M mode, the target priority counters beside the blips you've
designated are decremented each time you fire an AIM-54. The manual says
this should also happen in TWS-A but it does not. Despite this, the missiles
do automatically head for the appropriate targets when in TWS-A, you just
have to keep track yourself of which target will be fired at next.
The other radar modes besides TWS are simpler to deal with, and can
often be controlled from the front seat with only occasional hops to the
RIO position as necessary. The backspace key (or rightmost button on the
FlightStick Pro) can be used to lock up a target at "moderate" or "authentic"
difficulty level from PDSRCH or RWS modes though the manual says otherwise.
The manual is correct that this cannot be used to cycle through the available
targets. It is not possible to transition to PDSTT mode from TWS-A or TWS-M
modes. This was a big source of confusion to me when I was first learning
the game until I finally realized I had to switch to PDSRCH or RWS first.
Besides using the backspace key, the only other way to switch to PDSTT
is to click on a blip in the detailed digital display (DDD). It would be
much easier if you could choose the target you want to lock up from the
TID while in TWS or RWS mode since the DDD output is rather arcane, but
the game does not allow you to do this. The middle button on the FlightStick
Pro that is supposed to break a PDSTT radar lock does not work at "authentic"
level (I don't know if it works at any level), but the key command does
the trick.
When leaving PDSTT mode, the antenna elevation angle is sometimes left
pointing at the target that was locked up instead of being reset to zero,
so don't forget to move it back manually if desired. On the other hand,
manual elevation adjustments are sometimes lost when switching between
radar modes. One example (possibly the only one) is when switching from
PDSRCH to TWS. Speaking of antenna elevation angles, it's a good idea to
slew the radar cone up or down on occasion to search for bandits lurking
at different altitudes. It can sometimes prevent nasty surprises.
At the "authentic" difficulty level, the DDD normally shows the bearing
and closure rate of targets in the radar's scan cone. When you switch to
PDSTT mode, however, the DDD changes to show a plan view (bearing and range),
and even shows maximum and minimum ranges for the currently selected weapon
as faint bars on the left side of the display.
Many people complain of difficulty getting the datalink feature of the
TID to work. Datalinked target blips will only show up on the TID if you've
activated the DL button below the TID and if the targets are within either
50 nm (nautical miles) of the carrier or 100 nm of the
AWACS. You can be datalinked a maximum of eight targets at a time. It
seems as if the targets must in addition be within 50 nm of your plane
before they will show up as datalinked blips. The big advantage to getting
datalink information is that it will show you bandit positions (you never
get datalink blips for friendly planes) that are outside your radar search
cone, making it much easier to track enemy planes that are far above or
below you regardless of your radar mode or whether you even have your radar
turned on at all.
The digital "522" in the left middle portion of the RIO's forward view
(can be seen from look-up and look-down views) is a non-functional radio
frequency display.
Just below the HUD is a row of eight short and wide rectangles corresponding
to your missile hardpoints. White means a missile is hanging there, black
means it's empty, striped/checkerboard means it is selected to fire next.
When sitting in the front seat, the zoom and unzoom keys affect the
television camera system (TCS) in the look-up view and the TID in the look-down
view. In the latter case, it will zoom the TID in and out regardless of
whether the TID repeater is currently displayed in place of the horizontal
situation display (HSD). Note that the TID zoom level is totally independent
from the radar range. The former can be adjusted from the look down view
in either the front or the back seat, while the latter can only be changed
while in the look up view from the back seat.
The TCS is always slaved to the radar, and can be zoomed in and out
only when you have a target selected. The camera will track targets locked
up in PDSTT or highlighted in TWS mode. It is an excellent tool with several
uses. First, it lets you see if a target is small or large while still
a great distance away (> 80 nm). Second, it can verify target destruction
when attacking targets beyond visual range (BVR) so you know whether the
target needs another missile lobbed at it. Third, it will show target facing
(aspect) at moderate distances when it's too far away to tell by looking
directly due to the simulation's limited spatial resolution (320x200 pixels).
The manual says that putting the target inside the allowable steering
error (ASE) circle is not required for a successful missile launch. While
this is true, you should be warned that if the target is too far off the
nose of the plane, the missile will not guide at all, but will instead
either disappear soon after launch or dive for the earth. Take the time
to point your plane at least in the general direction of the target. It
is most important to be aware of this when launching AIM-54s in TWS mode
because there will be no HUD symbology to tell you where the next target
to be fired at is located with respect to your plane's nose. If this gets
confusing, try highlighting each target in the target priority sequence
in turn before you launch so you will get the target designator diamond
in the HUD. Realize, however, that the missile will go for the target it's
programmed for, which has nothing to do with whether you have it highlighted
or not--the missile doesn't know or care if you've highlighted the wrong
target by mistake.
Even if you do point your nose right at a target, it is possible for
an AIM-54 or AIM-7 to fizzle right after launch. When this happens, you
will see the missile's smoke trail appear in front of you then the smoke
will dissipate and the missile will have vanished into thin air. I'm almost
sure this is not a bug but the game's way of modeling enemy ECM, since
I have also seen radar guided missiles that were launched at me spontaneously
disappear from the tactical electronic warfare system (TEWS) display when
my jammer was on. The only ways around this seem to be to get very close
to the target (near minimum range) before firing, use AIM-9s or guns instead
to do the job, or tell your wingman to attack that particular target. Your
wingie's missiles don't disappear right after launch like yours do, but
they do seem to have a lower hit percentage when attacking targets that
make your own missiles go poof. He won't have a great chance of killing
the target, but it's better than your zero percent chance--once one missile
vanishes, don't bother firing any more at the same target for a while because
they'll all do the same thing.
Sometimes AIM-54s you fire will fly straight and level after launch,
never for a moment guiding toward the target you have designated in TWS-A
or TWS-M mode. This seems to occur if you manually designate some targets
in TWS-M, fire some missiles, then try to fire any more AIM-54s in TWS-M
or TWS-A modes. It doesn't happen all the time, but very often that second
batch of missiles will fly straight and level as if you did not have any
targets designated. The only workaround I have found is to either avoid
using TWS-M entirely, or if you do use it, designate as many targets as
you can before firing any missiles. Once you run out of manually designated
targets, do not use TWS modes to guide any remaining AIM-54s--use PDSTT
instead. This is inconvenient, but less frustrating than wasting your missiles.
Just remember that since the AIM-54 is fire and forget, you don't have
to stay in PDSTT after you fire which would tend to reduce your situational
awareness.
AIM-7s and AIM-9s may not be fired under any circumstances when in TWS
mode. If you have a target highlighted, you will see a target diamond on
the
HUD and may even get a shoot cue, but pressing the fire button will do
nothing if you have one of these missiles selected. In the case of the
AIM-7 this is probably a feature, since you must use PDSTT to guide your
missile to the target. For the AIM-9, however, this is clearly a bug. You
cannot fire a Sidewinder while using TWS mode even if the seeker head is
uncaged or the radar is off! You must switch to PDSRCH, RWS, or PDSTT mode
to fire.
Your waypoints do different things depending on the type of mission
you're flying. On escort missions, the first assigned waypoint moves constantly.
It stays close to the strike planes you're supposed to be escorting, and
is called "near plane." On some intercept missions, the first assigned
waypoint moves along with the plane(s) you are assigned to intercept. The
waypoint name in this case will be "plane." Other intercept missions will
provide you only with a CAP waypoint so you must find the bad guys yourself.
When on an escort mission, it's not really enough to know just the current
position of the planes you're escorting; you'd really like to know their
entire flight plan as well. If you're escorting a TARPS F-14, you'll be
able to see the waypoints that make up this flight plan by pressing the
"F-14" button on either the mission briefing or RIO map. For any other
type of escorted plane, you must press the "Other" button.
If you've forgotten what your mission objectives are or you're wondering
whether you've accomplished them yet, click on the "Briefing" button in
the RIO map.
There are only a few icon types used in the map displays. There are
separate icons for F-14s (looks like an F-14), cruise missiles (looks like
a missile), the E-2C Hawkeye (looks like a Hawkeye), U.S. strike planes
(looks sort of like a B-52), and all other U.S. or allied aircraft including
helicopters, (looks sort of like a MiG-21). In the debriefing map only,
all enemy aircraft show up looking sort of like a red MiG-21, and all neutral
aircraft use the same icon only in blue.
The difference between ordering your wingman into combat spread formation
and all the other ways you can get him to engage is that unless he is attacked,
he will stay on close your wing at your 3 o'clock position. This is my
preferred method of attacking targets at very long ranges with AIM-54s.
It keeps him close by in case of emergencies and it allows me to control
when he attacks by moving him between combat spread and cruise formations.
This minimizes double-targeting, which is pretty wasteful when slinging
missiles that run about $1,000,000 a piece.
The target directive command works just fine while your wingman is in
combat spread even though the manual seems to state that you must tell
your wingman to go tactical before it will work. It probably meant that
if you issue a target directive and then tell your wingman to go tactical,
he will forget who you want him to attack so you'll have to tell him again.
It is not possible to issue a target directive for a radar blip highlighted
in TWS mode; a PDSTT lock is required.
A PLAYER'S GUIDE TO FLEET DEFENDER
PC Manual
Quick Reference Card
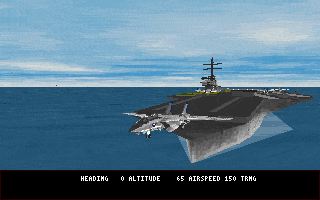
CARRIER LANDINGS
Being able to trap safely and "by the book" every time in FLEET DEFENDER
is not overly difficult once you know what to do and have practiced a bit.
While the manual describes the general procedure fairly well, it leaves
out the really important details that can make the difference between nailing
the three-wire and either crashing into the sea or getting waved off repeatedly.
RADAR OPERATION
The AWG-9 radar carried by the F-14 is an extremely complicated system
that is not easy to use. Besides modeling the realistic user- unfriendliness
of the AWG-9, FLEET DEFENDER throws a few bugs and documentation errors
into the mix to make operating the radar even more confusing. Hopefully,
this section will make things a bit clearer.
OTHER INSTRUMENTS
The column of warning lights in the right HUD brace ("AI," "AAA," and "SAM")
is not documented. The lights indicate what type of radar has you locked
up: "AI" means air intercept radar, "AAA" means anti-aircraft artillery
radar, and "SAM" means surface-to-air missile radar. If the indicator is
lit, it means you have been locked up. If the indicator is flashing, it
means you have been fired upon, so either a missile is heading your way
or AAA is flinging BBs at you. A bug sometimes occurs where the AAA light
keep flashing even after you leave the area and all the way back to the
carrier. If you don't see tracers flying when panning around in the external
view, you've got nothing to worry about.
WEAPON USAGE
Employment of weapons is pretty well covered in the manual, but there are
some strange situations and bugs that can be frustrating if you don't know
how to deal with them. This section will provide some hints and procedures
to follow to get the most out of those expensive missiles you've dragged
along.
MAPS AND WAYPOINTS
Descriptions of the mission briefing and RIO maps are sketchy in the FLEET
DEFENDER manuals, and waypoints are hardly discussed at all. This section
tries to fill in the gaps.
WINGMAN CONTROL
While the game manual coverage of wingman commands is adequate, it seems
to be a source of confusion for many people so some clarification seems
appropriate. Your wingman will engage targets on his own only under the
following conditions: you put him in combat spread formation, you tell
him to go tactical, you call for a bracket, you order him to sanitize a
particular direction, or you declare yourself engaged defensive. Under
no circumstances will your wingman fire on a target if he is held in cruise
or parade formation.
DIGITIZED SPEECH
Microprose made available a file on their BBS that contained a complete
list of all digitized voice messages in FLEET DEFENDER along with their
meanings. I've included an abridged set of only the more obscure ones below.
| WINCHESTER | Wingman is out of missiles |
| FOX1 | Wingman has launched Sparrow missile |
| FOX2 | Wingman has launched Sidewinder missile |
| FOX3 | Wingman has launched Phoenix missile |
| SINGERLAUNCH | Ground missile has been launched |
| SINGER | Ground radar has been detected |
| SPIKE | Radar has been detected |
| LAUNCH | Someone has launched at us |
| YOURE_A_MORT | If you are hit during an Oceana Training mission |
| CLEAN | No bogeys near |
| NOFACTOR | Bogeys are not considered a threat (if not at war) |
| INVESTIGATE | Could be hostiles, check out if possible. Do not fire (not at war) |
| VID | Visual ID bogeys, could be hostiles but friendlys are near by. Do not fire (not at war) |
| RED_FREE | Hostiles have launched at you or at carrier group. You have been cleared to fire (had not been at war, but situation has changed) |
Missiles can be outrun. If you are fired at from astern at long range, consider pushing into an unloaded dive at full afterburners and trying to run outside its maximum range. Similarly, you should not fire your own missiles anywhere near their maximum effective range unless the target is heading towards you. If in a tail chase situation, you should close even further, possibly below half the maximum weapon range, to be sure that your missile won't run out of steam.
When you get in close, you should switch to BRST or VSL. In a turning fight, VSL is much more useful except when you want to pick out a particular target from a crowd. If you find yourself pointed at a bandit farther than 5 nm out that you want to attack, you can switch to PDSRCH or RWS and then use the backspace key as described above, but in between those two steps you must remember to jump to the back seat briefly to extend the radar range and widen the scan cone since it will still be set to a narrow 5 nm pattern from when you were in BRST or VSL. You may also have to adjust the radar range any time you leave PDSTT because that mode leaves the range setting at the lowest possible distance that can contain the locked up target.
Ordnance and fuel load have a drastic effect on all aspects of the F-14's performance. It will perform like a dog with full internal and external tanks and four AIM-54s, but get it down to half internal fuel and just guns and it will accelerate faster to higher speeds and have much greater turn performance. As an extreme example, an F-14 fully loaded with missiles and fuel may be able to pull 6.5 Gs maximum in a level break turn starting at 375 KIAS. Drop the missiles, external tanks, and all but 1000 pounds of fuel and the same plane will be able to pull 9.0 Gs. Big difference! Keep this in mind when deciding whether to dive into a furball or get out of dodge.
The F-14 accelerates very quickly in a dive (in the game, at least). Use this to your advantage when you want to disengage. You may be surprised how quickly the mach number winds up after you nose over into a steep dive. Even in a turning fight, just keeping your nose a few degrees below the horizon helps considerably in maintaining your airspeed.
To make the most of the missiles carried by my wingman, I keep him on a tight leash, moving him from cruise formation to combat spread only briefly when I have a specific target I want him to engage BVR. Once he launches I move him back into cruise. Until I get engaged, I use him strictly as an auxiliary missile carrier, an extension of my own plane. If a dogfight develops, I cut him loose ("go tactical" or bracket) and we try to support each other as best we can.
Although AIM-54s are really designed for attacking unmaneuverable targets like bombers and cruise missiles, you should really save them for fighter targets unless you can accomplish your objectives by downing larger aircraft at such long range that you are in no danger of attracting the attention of the escorting fighters. There are two good reasons for doing this. First, in FLEET DEFENDER, AIM-54s are very effective against fighters. Second, front line Soviet fighters like the Su-27 and MiG-29 carry missiles with longer ranges than your next biggest stick, the AIM-7. Engaging such fighters with just AIM-7s and AIM-9s practically guarantees that you'll end up in a furball after the initial missile exchange. Even worse, unless you sneak up on your victims, the other guy will get the first shot, immediately putting you on the defensive against a superior dogfighter. This is clearly a situation you want to avoid if at all possible.
You generally want to save long range missiles for fighters, but don't hesitate to use them against enemy bombers and reconnaisance aircraft if you have to because most of them are armed with deadly radar directed tail guns. If you are forced to attack one with your own gun, either set up for a deflection shot that keeps you out of the target's rear hemisphere both on the approach and on the breakaway (in case you miss), or if you must come from behind, set up your lead early and fire bursts constantly as you close to within gun range. You can tell you're at maximum gun range when the range caret on the 5-mile range scale on the right side of the HUD is pointing at the base of the third dot from the bottom of the scale. If you enter the firing arc of a tail gun you have less than a second to shoot down the bandit before you are shot down yourself. Even if you do manage to get the kill, your plane may be severely damaged.
This article is Copyright (C) 1994 by Robin G. Kim for Game Bytes Magazine. All rights reserved.
World time